Gaming Lag Fix..
For a few months my once ‘high end’ gaming laptop the Asus G50-x5 has been annoying me with serious lag spikes while gaming, this would occur 8-10mis after starting a game and last for about 4-5mins with frame rates dropping as low as 4-5fps, this made most games unplayable. For a while I thought it’s probably time for it to hang in the gloves and look for an upgrade, until I realized that the games that worked earlier without a hiccup were now unplayable. After some googling and upgrading my display drivers (with no luck) I realized I needed to open it up and clean its innards.
Turns out the heat-sink was clogged with dust (practically mud!!), living in Mumbai can have that effect, no matter how clean you keep it and besides this laptop is almost 3 years old now, so a good flush of its guts was much needed. I have opened it up in the past for the occasional cleaning, but never specifically looked for the heat-sink vents, which as I learnt is what matters most. With the vents to the heat sink blocked the laptop would circulate the hot air inside the case, which should otherwise flow out the sides.
If you are facing the same issues read on, for guide on how to go about the task. Thankfully my laptop allows easy access to the fan without having to take the whole thing apart. This guide is based on the steps for an Asus G50 "Republic of Gamers" Laptop.
What you need: - the right sized screwdrivers (Phillips), acetone, thermal compound(for the gpu/cpu), compressed air for cleaning.
Steps: -
- Remove the battery and unscrew the large cover from the bottom of the laptop. Revealing the HDD, RAM, Fan, etc.
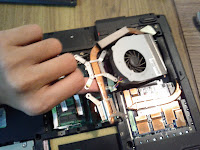
- Gently unplug the fan and unscrew the 6 screws on the fan/heatsink (i.e. 4 on the CPU and 2 on the GPU)
- Turn the fan/heatsink over and unscrew the 3 screws on the fan and separate it from the heatsink.
- Now blow the compressed air or through the blocked fins of the heat sink, use a brush or a needle if required.
- Once all clean attach the fan back to the heatsink with the 3 screws (step 3).

- Clean the points of the heatsink that comes in contact with the CPU and GPU. By clean I mean remove all the earlier / factory applied thermal compound / heat sink paste using acetone.
- Now apply the new thermal compound, (all you need is a drop about 2-3mm in diameter) on the CPU and GPU.

- Put back the fan/heatsink and the 6 screws removed in step 2.
- Plug the fan back, put back the back cover, battery and power on!


You should immediately notice your laptop running cooler and games are now playable again.
Hope you find this useful, don’t blame me if you mess up though, however there isn’t much that can be done wrong, it’s just basic cleaning.
Do write in if you have any further questions. Until then I’ll be solving crime on L.A.Noire.
:) I like the part about how living in Bombay makes the laptop dirty..
ReplyDeleteGreat post Mr. Detective! So do we get a review on the game you playing too?
guide.
ReplyDeleteThanks for giving information.It's very useful tips for beginners.When i had a lag problem while playing online game,i followed the same way.After that i checked my lag rate whether it's low or high using WhoisXY.com I got good results.
ReplyDelete